Magnetic Locators GA-52Cx

|
|
Unmatched sensitivity allows you to find what you're looking for quickly, without the risk of passing over your target. |
|
|
Our
locators last 100% to 250% longer than others, |
|
|
85% of the Surveyor market can’t be wrong. |
Quality
Is Our Hallmark
Schonstedt's underground magnetic locators have been setting the standards for
reliability and dependability for over 30 years. They are designed to withstand
the rigors of daily on-site usage and a wide range of environmental conditions.
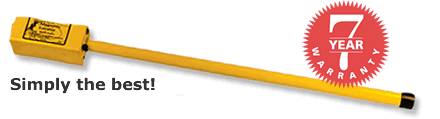
In fact, the Model GA-52Cx is so rugged and dependable it's backed by a 7-year
warranty.
Specifications & Features
Features
- Seven Year Warranty
- Enhanced target definition
- Unsurpassed detection range
- Piezoelectric speaker
- Clear, sharp, detection signal pinpoints the target
- Five individual sensitivity settings
- No response to aluminum, brass, or copper
- Ease of operation reduces search time
- With experience, user can distinguish between small pieces of scrap iron and actual targets
- 40-hours operation (intermittent usage) on two economical 9-volt batteries
- Modular construction
- High performance components
- Weights approximately 2 1/2 lbs
- Weather protected controls
- Rugged lightweight case
- Patented HeliFlux® sensors
Both the GA-52Cx and the GA-72Cd are standard with a custom case designed to withstand the rigors of field use.
![]()
Specifications
|
Input Power |
Two alkaline 9-volt batteries |
|
Battery Life |
40 hours (intermittent usage) |
|
Output |
Approximately 40 Hz audio tone on speaker. |
|
Weight |
Approximately 2.5lb. (1.13 kg.) |
|
Operating Temp |
-13° to 140°F (-25° to 60°C) |
|
Overall Length |
42.3 in. (107.4 cm) |
|
Waterproof Length |
34.5 in. (87.6 cm) |
|
Nominal Sensor Spacing |
20 in. (50.8 cm) |
|
Construction |
Modular, all solid state |
(We reserve the right to change specifications)
|
Easy-To-Use No. 1 Around the World |
Only
two Controls
Designed for one-hand operations, the On/Off-Sensitivity and Volume controls
are located on the underside of the cover on both locators. This provides easy
access, protects the knobs and contributes to their overall ruggedness and
dependability.
Check out our other locators too:
Magnetic Locator GA-92XTi & GA-92XTd
|
A Magnetic Locator that will single
handedly |
|
|
|
…and
best of all, it’s a SCHONSTEDT |
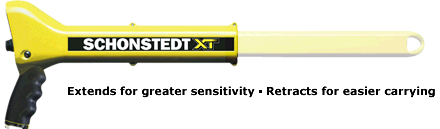
Time to make a move to the new Schonstedt XT, the greatest innovation in magnetic locating since the celebrated "yellow stick". In its holster, the XT leaves both hands free on the way to the job site, then gives you the freedom to do your best work with one hand tied behind your back.
Magnetic Locators GA-72Cd

|
|
|
Unmatched sensitivity allows you to find what you're looking for quickly, without the risk of passing over your target. |
|
|
|
Our locators last 100% to 250% longer than others, making your investment a solid one. |
|
|
|
Audio signal and 3-digit LCD readout |
|
|
|
|
|
|
|
|
|
Magnetic Locator Comparison Chart |
||||
|
|
GA-52Cx |
GA-72Cd |
GA-92XTi |
GA-92XTd |
Mac-51Bx |
|
Major features |
Most Popular |
Most Rugged |
Most Portable |
Most
Portable |
Magnetic
Locator like GA-52Cx |
|
Output |
|
|
|
|
|
|
Audio |
|
|
|
|
|
|
Visual |
|
|
|||
|
Indicators |
|
|
|
|
|
|
Battery |
|
|
|
||
|
Sensitivity |
|
|
|
||
|
Sensitivity controls |
5 levels |
4 levels |
Continuous |
Continuous |
Continuous |
Locating Tips: Magnetic
Magnetic
Locators and Circuits
Magnetic locators such as the GA-52Cx
and GA-72Cd can be used to determine if a circuit is active, such as an automobile
rear window defogger grid, or a radiant heat panel. Set the sensitivity of the
locator on high, and place the instrument sensor (the tip) near the window
grid, ceiling panel, etc. Listen for a change in the output tone when the
circuit is activated by its on/off control.
Searching
Near a Fence
Searching in the vicinity of a chain link
fence requires a reduced sensitivity setting and also some control over the
orientation of the locator. As illustrated in Figure 13, position the locator
horizontally, with its long axis perpendicular to the fence. This ensures that
the upper sensor is kept away from the fence.
Perform the search by slowly moving the locator forward along the fence while also moving it in to the right and to the left. This technique allows you to search an area several feet wide as you move forward. Listen for an abrupt drop in the signal, (as shown by the null in Figure 14.) that will occur when the lower sensor, located 1-5/8 inches from the end of the locator, is directly over the stake. Any variation in the position of the locator will produce an abrupt rise in the frequency of the signal.
Figure 13
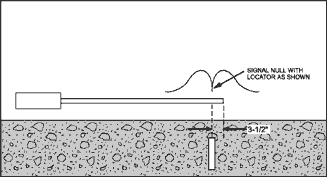
Figure 14
Energized
Power Lines
A burbling sound on the GA-52Cx or
GA-72Cd indicates the presence of an energized power line.
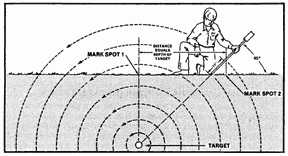
Determining
Target Depth by Triangulation with the MAC-51Bx
The receiver can be used for the traditional triangulation method to determine
the approximate depth of a target as illustrated in below. However, when using
this method it is necessary to take into account the fact that the center of
the cable-sensor is located 11 inches up the receiver tube from the black tip.
When the position of the target has been determined by the null, mark the spot
(#1) on the ground. Hold the receiver tip on the ground at this spot, slant the
instrument at a 45o angle and slowly move directly back, to one
side, from the target until a second null is obtained. Now mark a spot (#2) on
the ground that is directly below a point 11 inches up the receiver tube from
the black tip. Measure the distance between spot #1 and spot #2. This
measurement indicates the approximate depth of the target.
NOTE
You should always take a depth reading on both sides of the line. If the
measured distances between spots #1 and #2 on both sides of the line are not
the same, there is a good chance that a nearby line is causing the two
measurements to be different. Move further along the line and repeat the depth
reading procedure until the measurements are the same on both sides of the
line. Once two very similar measurements are obtained, the calculated depth of
the cable will always be within 4 to 6 inches of its actual depth.
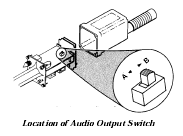
GA-72Cd
Audio Response
Tired of the continuous tone of the
locator? Remove the cover and move the slide switch to the other position. The
locator sound will now change in volume as the presence of the target becomes
stronger (instead of changing frequency).